As we are venturing into the GAPS intro diet today, I wanted to take some time to explain a little more about Joel's dietary situation and why we are doing the GAPS diet for him and the rest of our family. As I have mentioned in previous posts, Joel had issues with lots of sickness as a baby/toddler. We had him on an insane amount of antibiotics trying to cure what seemed to be the never ending ear infection, realizing now that we were not helping his ears and were also simultaneously destroying the lining of his gut. Once we discovered he had food sensitivities and changed his diet accordingly, his health cleared up! We continued to eat healthier and healthier and have enjoyed a much greater level of overall health in our family as a result.
However, about 6 months ago I began to notice that Joel seemed to be regressing a little. Out of nowhere he got a random ear infection. He seemed to be lacking energy in the morning. And he also started complaining of more and more stomach aches. With some more probing I also discovered that he was experiencing some minor reflux at times. I had heard before that food sensitivities can change with time so we decided to get him retested. I still am not sure whether doing so was a good thing or a big mistake :)! His list for foods he was HIGHLY sensitive to was huge. I cried when I first got the results.
The good news is that he is doing really well all things considered. We don't have any major issues with him and it could be so much worse. The bad news is that our findings pointed to him not just have a few food sensitivities, but more likely an issue called Leaky Gut. For more info on this read here b/c I won't do the best, most accurate job of explaining it. What I will say is that I have come to understand that this condition causes the body just to not tolerate foods well. You can avoid the problem foods and get better, but then eventually the body grows sensitive to the foods that you use to replace the old ones. Hence, you end up with a whole new list of food problems. This is not a good prognosis.
So we were left with a few options. Option one, and in my opinion the very best, was to pray for God to supernaturally heal Joel. I believe in a powerful God and know He can do this. So we prayed and asked, and continue to pray and ask. His tests said he could do some dairy so I tried to start introducing some and believing for his body to be made whole in the meantime by God. However, every time I gave him dairy he would throw up approximately 2 days later. I tested this enough to know that it is for sure the dairy that would cause the vomitting. So I stopped the dairy. And I realized that while God definitely can heal Joel, I need to do something to help in the meantime. So I prayerfully looked to our other options.
One option was to just remove the foods he was sensitive to. However, in the longer term he would probably just grow sensitive to other foods in his diet so this was not a good option. I could do a rotation diet, but that seemed hard to administer. And it's promises for healing didn't seem as clear. Our other option, which I had already read a lot about, was the GAPS diet. This diet restricts certain foods with the goal to give the digestive track a rest to heal. It tends to take 2-3 years for the healing to be complete. But at the end of it, the individual is usually able to eat almost all foods with no problem. However, the costs involved seemed so huge I didn't feel up for it. So I kept putting it aside. But finally I hit the point where I was willing to make the sacrifice and just do it.
While Joel is the main one in need, I decided to put the whole family on it. I felt we could all benefit ( I know I could). Plus it seemed a bit cruel to deprive Joel so much and eat things he can't have right in front of him. We are a family and I want to support him as a family. In addition, I don't want to be cooking a million different things. One same diet is simpler.
So that is the gist of why we are on this crazy journey. We have spent 3 months on the full gaps diet and Joel has shown some minor improvement. The major healing though seems to come through the introduction diet which is an elimination diet of sorts. Today is our first day on it! I have no idea what kind of road we have in store, but I know I will just regret it if we don't try. So we are going to try to stick it out, taking it just one day at a time!
Monday, June 3, 2013

Friday, April 12, 2013
Our Responses to GAPs So Far
I have not really wanted to write about our family's response to this new diet, mostly because things have just been so rough ever since we began it. Now, I do have to mention that I probably didn't choose the best time to begin GAPS. I didn't figure it would be a big deal for us as it wasn't that far off from how we were eating before. But at the time we started I was on the verge of burnout from an incredibly busy season and not sufficient down time to process the business and stress of life. Our second week into the diet my husband was out of town for a few days , and I think the perfect storm ensued and pushed me over the edge.
By week two of GAPS myself, my daughter Elise and my two younger boys all had mild colds. We don't get sick very often, and almost never all at the same time. This might have started with just some die off, though it is hard to be sure. Funny enough, Joel didn't get sick - and he is the one most in need of GAPS. I figure if anyone would have die-off reactions it would be him. Anyway, after about a week Elise improved and has been great ever since. After another week the younger boys and I were improving, when all of a sudden we all took a turn for the worse. James and I came down with a flu-type bug. This only lasted about a day, but for me it quickly turned into a heavy duty sinus infection which got so bad I resorted to a 3 day round of antibiotics. Now if you know me, you know I am VERY anti-antibiotics. It is largely what got us in this digestive mess to begin with. GAPS is all about healing the gut and antibiotics destroy the gut lining because they kill the bad AND good bacteria. So I was really not thrilled to go this route, but I couldn't function with the pain and my naturopath recommended a low dose to help me out.
I finally got better, though am still working to get to a place where my energy is back and my sinuses are completely clear. I am struggling with fuzzy ears and a bit of congestion, which is frustrating for me because I have enjoyed a very long season of health with not an ounce of congestion. And now Erik and James are both down with colds, AGAIN. James even has a minor fever. Seriously! These kids rarely get sick and if they do it is a minor cold, or James will get a minor teething cold - just lots of clear congestion and snot. But this feels a bit ridiculous. And in all honesty it is really wearing me out.
On the plus side Joel has been healthy and he has not been experiencing reflux or stomach aches. And everyone is doing fine with the food changes. Digestively we seem to be doing okay - no crazy stomach aches or anything. But overall there is very little positive to show for the GAPS diet so far. It is very hard to understand if this is all just coincidental, or if the diet is not just for us, or if we have a bunch of health issues we just weren't aware of that GAPS is bringing to the surface. I am working with a GAPS nutritionist and with my NP and am praying like crazy hoping God will bring some clarity to the situation and some guidance. I wish I had something better to report after these 6 weeks of GAPping it up. But this is where we are at. Hopefully I will have something more positive to share in the not too distant future!
By week two of GAPS myself, my daughter Elise and my two younger boys all had mild colds. We don't get sick very often, and almost never all at the same time. This might have started with just some die off, though it is hard to be sure. Funny enough, Joel didn't get sick - and he is the one most in need of GAPS. I figure if anyone would have die-off reactions it would be him. Anyway, after about a week Elise improved and has been great ever since. After another week the younger boys and I were improving, when all of a sudden we all took a turn for the worse. James and I came down with a flu-type bug. This only lasted about a day, but for me it quickly turned into a heavy duty sinus infection which got so bad I resorted to a 3 day round of antibiotics. Now if you know me, you know I am VERY anti-antibiotics. It is largely what got us in this digestive mess to begin with. GAPS is all about healing the gut and antibiotics destroy the gut lining because they kill the bad AND good bacteria. So I was really not thrilled to go this route, but I couldn't function with the pain and my naturopath recommended a low dose to help me out.
I finally got better, though am still working to get to a place where my energy is back and my sinuses are completely clear. I am struggling with fuzzy ears and a bit of congestion, which is frustrating for me because I have enjoyed a very long season of health with not an ounce of congestion. And now Erik and James are both down with colds, AGAIN. James even has a minor fever. Seriously! These kids rarely get sick and if they do it is a minor cold, or James will get a minor teething cold - just lots of clear congestion and snot. But this feels a bit ridiculous. And in all honesty it is really wearing me out.
On the plus side Joel has been healthy and he has not been experiencing reflux or stomach aches. And everyone is doing fine with the food changes. Digestively we seem to be doing okay - no crazy stomach aches or anything. But overall there is very little positive to show for the GAPS diet so far. It is very hard to understand if this is all just coincidental, or if the diet is not just for us, or if we have a bunch of health issues we just weren't aware of that GAPS is bringing to the surface. I am working with a GAPS nutritionist and with my NP and am praying like crazy hoping God will bring some clarity to the situation and some guidance. I wish I had something better to report after these 6 weeks of GAPping it up. But this is where we are at. Hopefully I will have something more positive to share in the not too distant future!
Wednesday, April 3, 2013
Natural Childbirth Part 3 - Some Keys to Giving Birth Naturally

I have four beautiful children, all birthed naturally. I absolutely am no rock star and possess no super powers that enabled me to do this. But these births did not come easily, or without cost or serious thought or intention. They did not happen accidentally and I don't believe I was just lucky (though I do count myself very blessed to have had such great birth experiences). There are some key factors that I believe contributed to my being able to give birth naturally and I would like to share these with you today, especially for those of you who might be considering going the natural route.
- I made a firm decision that I was going to do birth naturally. I think this is one of the most important factors if you want to have natural childbirths. I have spoken with several moms who were really on the fence about it, and I don't think any of them ended up doing it naturally. It does take some strong will power and if there is a huge option in your mind to do things otherwise, there is a really good chance you will cave in the process. This is not to put down a mom who "caves". Labor is intense! But that is why you cannot make the choice during labor! You must make it before and have a partner who is willing to help you stick to your decision. And ultimately, you need to be convinced in your own mind that this is the best for you and your baby. I don't recommend going for a natural birth out of peer pressure, or because you feel you "should" if you aren't truly convinced yourself that it is the best way to go.
- Make sure you and your partner are on the same page. With two of my births I requested something just to take the edge off. My hubby knew what I wanted deep down and he pushed back on my requests. He wasn't bossy, but he reminded me of what I wanted, and I am soooo thankful he did. Having a partner who is 100% in support of what you are doing is invaluable!
- Prepare! I mentioned in my post about the Bradley Class we took. I cannot recommend this enough if you want to have a natural childbirth. It will give you the education and preparation you need to succeed. BUT, you actually need to do what it says. Follow the diet, do the exercises and practice, do the homework.
- Write a clear birth plan and share it in advance with your doctor or midwife. In the plan be sure to mention that you do NOT want pain medication offered - that YOU will ask for it if you want it. This is huge because as I said above, it is really easy to cave if it is offered!
- Find a supportive doctor or midwife. I used a doctor for my first 3 births and it worked fine for me because we were very clear with them about our goals and they were able to support us. I will say that it was much easier to do things at home with a midwife though, so I would also suggest considering a qualified midwife.
- Bring your birth plan with you to the birth and share it with your birth team/nurse. Also, make friends with your nurse and try to develop rapport with him/her. We really gelled with our nurses and they were HUGE supports to me in my deliveries. If you are not getting along with your nurse, ask for a new one!
- Focus on the benefits of natural childbirth and the blessing of childbirth in general. If you are a Christian I highly recommend this book in which a woman shares her faith for pain free childbirth and many scriptures that she stood on in the process. While my births were not 100% free of pain, they were definitely doable and I think my outlook and faith on birth helped a lot!
- Watch "The Business of Being Born". I believe this is available on Netflix and is an amazing documentary on childbirth!
- Go see a chiropractor during your last few months of pregnancy. Chiropractic can help position baby for birth and aid in him or her coming through the birth canal smoothly. If your back is out or your body is not properly aligned this can make getting baby through the canal much tougher.
- Remember, when you get to the point during birth that you don't think you can go on, you are probably very close! Just hold on a bit longer!
Now that I have shared my thoughts on natural childbirth, I am going to try to write up and share my own birth stories with you very soon so you will get to see how all of this played out in my own life!
NOTE: Sometimes things just don't go as planned. I have a few wonderful friends who had decided firmly to do naturally childbirth but opted for epidurals after excruciatingly long births. This is not to discourage because I think this is the exception, not the rule. BUT, if you decide on a natural birth and things don't go as planned, take this as part of your journey and celebrate what you did accomplish and the most important part of the whole thing - your baby!! And do not let that determine what future births will be like for you. Things can go differently next time!
Monday, April 1, 2013
Natural Childbirth Part 2 - Some Benefits of a Natural Birth

Last time I talked about our experience with taking the Bradley Method class. As a result of that class, when it came time to give birth the first time, I felt ready. Of course I was nervous because it was all new to me, but I felt prepared in many ways. And Nik, my husband, felt prepared as well.
In many, many cultures natural childbirth is just a part of life. And wisdom for birthing is passed on generationally, so there is much less mystery to the whole process. But in the US birth has really been boxed into a sterile hospital room where the doctor runs the show and the mom just shows up and does what she is told. I feel so strongly that women need to be empowered and encouraged. Our bodies were made to do this! And while the experience for every mom is different, and there are of course exceptions where natural child birth is not possible, natural childbirth has so many incredible benefits, including:
In many, many cultures natural childbirth is just a part of life. And wisdom for birthing is passed on generationally, so there is much less mystery to the whole process. But in the US birth has really been boxed into a sterile hospital room where the doctor runs the show and the mom just shows up and does what she is told. I feel so strongly that women need to be empowered and encouraged. Our bodies were made to do this! And while the experience for every mom is different, and there are of course exceptions where natural child birth is not possible, natural childbirth has so many incredible benefits, including:
- Mama empowerment. I felt amazing knowing that I birthed a child into this world naturally. Now please don't get me wrong, giving birth is an AMAZING accomplishment no matter how it happens, but knowing that my body was made by God to do this, something in me felt a longing to do it without medicine. I felt strong and courageous and a huge satisfaction knowing that I had done it (with God's help and an awesome coach of course :) ).
- A more alert baby. Often, but probably not always, babies who are born without medical intervention are more alert upon delivery because they don't have those pain meds going through their bodies.
- Just one more healthy gift to the baby. I don't personally believe that medication during birth is a deal breaker to a healthy baby being born. However, I do believe in giving every possible blessing and health benefit to baby that we can. When a mom receives pain medication during delivery this does get transferred to the baby and can have effects. My first nutritionist said that she has worked with many moms whose babies developed reflux as a result of being exposed to meds during their delivery. Medication can have a negative effect on the mom's and baby's digestive track. A healthy gut is essential to overall health. Not to mention the toxins that get transferred to the baby through the medication. So if we want to give our babies the very best start to a healthy life, natural childbirth is really something worth considering.
- A quicker recovery for Mama. I have had a few friends who have experienced both natural birth and medically aided births. And most of them have commented that they definitely recovered quicker from the natural birth. Plus, it is WONDERFUL to be up and mobile right after giving birth, seriously!
- Tagged onto that last point, when you are not being medded up, you can be mobile during your birth. I was very mobile during my last birth, which also happened to be my longest. But due to my mobility I also believe it was probably my easiest birth.
Are there costs to a natural birth? OBVIOUSLY! If not we wouldn't have so many medical interventions these days. But I am convinced that part of the problem is that we have psyched ourselves out as women. We have become so scared of natural child birth and we don't believe in ourselves, that we can do it. And it doesn't help that we live in a culture where everything is supposed to come easy, without a price. Why pay a cost when you don't have to?
My view on childbirth is that it is a gift from God to give birth. What is more amazing than bringing life into this world through your own body? I feel so blessed to be a woman and to have this privilege. There was some serious pain involved, yes. But still I believed for each of my birth experiences to be a good one, and I can honestly say, that in midst of the pain, each one was such a wonderful experience - a true gift from God! This is much more possible for us women than our culture would have us believe!
I want to end with a word of balance. Because of the culture we live in, natural childbirth is not incredibly common. And therefore I do think it is a legitimately tough decision to make. I have the utmost of respect for every woman who brings life into this world, whether through natural means or not. I encourage women to at least think through their decision, and not just lightly follow the crowd. But ultimately my intention is NOT to cast any condemnation on any woman who chooses differently than I did. We are all unique women who have not walked a day in any one else's shoes and therefore it is not our job to judge one another, but rather to support and encourage each other in this venture of birth and motherhood!
In my third and final post on Natural Childbirth, I will share some keys that I have found helpful to succeeding in giving birth without intervention. In the meantime, if you would like to learn more about the history of childbirth in this country and about what your options really are, I recommend viewing "The Business of Being Born", an excellent documentary on the subject!
Friday, March 29, 2013
Natural Childbirth Part 1 - The Bradley Method

Starting in college I had this idea that I really wanted to give birth naturally when I had kids. My mom had given birth naturally and said she felt it was totally doable. A lot of women in my church were also giving birth naturally. It sounded like such a great idea, but in all honesty I had NO idea what I was talking about. NO idea!
Getting pregnant was a lot more challenging than I expected. I got pregnant with our first child after several months of "trying" to get pregnant, but quickly miscarried at 5 weeks. It was heartbreaking. Then a few months later I had a season of major health issues that I needed to work through before trying to get pregnant again. But right before our first baby would have been due we got the wonderful news that we were pregnant again! We were starting our big adventure in parenting!
Right away we had some friends recommend to us The Bradley Method. This is a childbirth training program that both helps bring amazing education on pregnancy and birth, but also provides practical training and methods to aid natural childbirth. The focus of the Bradley Method is to give parents the all the resources, knowledge and preparation they need to make the best choices for them and their baby regarding the birth and to be as prepared as possible to do birth without any unnecessary medical intervention. In this, the parents are actually in the decision-making driver seat as opposed to just showing up and doing whatever the doctor recommends you do. Upon our friends recommendation, we signed up for a 12 week class and our education began!
Twelve weeks seems like a huge time commitment. I look back on those weeks with much fondness though. Each night was our special night to focus on baby and then we would get home and snuggle on the couch together and watch some PBS. Ah, memories! Now we are lucky to get 30 quiet minutes on any given day without our sweet bunch screaming around us. But I digress :). From our very first class I was SOOO glad we were taking it. And I began to wonder why I had previously thought I could go into birth and just somehow manage to do things naturally. I knew nothing of labor and nothing about delivery. Some women can go in cold and manage a natural childbirth. I don't think that I could have been one of them. Education is key to having a natural childbirth - I am convinced of this!
So here is what our education included in our Bradley Class:
- We learned about why a natural childbirth is desirable and the possible effects of the different medical interventions.
- We learned about how a healthy diet can support a healthy pregnancy and labor. Bradley includes a checklist of what things to include and what to exclude. For me eating became my full time job and I would say that this was a huge step in my developing convictions on healthy eating. I don't know that I would follow their nutrition advice to a t today, but for me at the time it was an excellent start!
- We learned about pregnancy and how the baby develops.
- We learned about the stages of labor and how to recognize each one.
- We learned about practical pain management techniques, and we practiced this in class and regularly at home (Moms, this involves getting massaged by your partner regularly!).
- We learned about how to form a birth plan and how to communicate your birth wishes with your doctor or midwife.
- We learned some of the practicals of breastfeeding.
- We also talked about when things don't go as planned, and how to handle birth surprises or problems.
- The class also focuses on training the dad to coach the mom and support her in the birth goals.
- And more!
While I believe the benefits of the Bradley Method are amazing, some are a bit put off by it. I think that whether or not you choose a natural childbirth, the education is awesome. But Bradley Method has a clear opinion on natural childbirth, and it would be tough to take the class and not feel that. However, I personally LOVED my experience and feel it was invaluable in every single birth experience I had. I highly recommend investing in this class if you have any interest at all in a natural childbirth!
In my next post I am going to talk about some of the benefits to a natural childbirth and why I am such a huge advocate!
Tuesday, March 26, 2013
Pureed Carrots

Breakfast is the most challenging meal for me to make right now. Joel tested very high in his sensitivity to eggs and that was a big go-to for us for breakfast. I am limiting him to one egg dish per week until we start the GAPS intro diet. We also used to eat oatmeal or buckwheat a couple of times a week. So when I first started trying to plan what we could eat on this diet I just didn't know what we could possibly eat for breakfasts!
Sausage and bacon seemed like simple solutions for some of our meals. But then what would we eat with that? I ended up trying out some different veggie purees. These can be made sweet treat with just a little bit of raw honey added. I made butternut squash puree last week and this week I tried out carrot puree. Here is what I did:
Pureed Carrots
Ingredients:
- 2-4 Tbsp coconut oil (I used lots, but you could easily do it with less)
- 1/2 onion, diced
- 1-2 lbs carrots sliced (I probably used a little less than 1 1/2 lb)
- 1/2 cup or more of broth
- dash of salt
- honey (optional) - I didn't use this as I found the carrots were sweet enough on their own.
Heat oven to 375 degrees. Put sliced carrots on cookie sheet or other pan. I used my ceramic Pampered Chef baking pan. Cook carrots until softened (maybe 15-20 minutes). Meanwhile heat the coconut oil in skillet or stainless steel pan. Add the onion and saute soft. Add onions, carrots, broth and salt to vitamix and use tamper to blend until smooth. Add more broth or water if needed.
I have also made this by steaming the carrots and onions together and then adding everything to the vitamix and blending. Bot times the kids have loved this!
I have also made this by steaming the carrots and onions together and then adding everything to the vitamix and blending. Bot times the kids have loved this!
Friday, March 22, 2013
Yummy GAPS Tomato Sausage Stew

At the time I am writing this, we are about 3 weeks into the GAPS diet. Our stomachs seem to be doing great! Joel was having some tummy problems the first couple of weeks but they have improved this week. We have been dealing with sniffles for the past two weeks which is frustrating, but that might be an issue of us working out our probiotics since the colds appeared immediately after switching to a new brand. I don't think it is merely that we caught colds because it doesn't ever take us this long to get over colds. But who knows? I am praying we will get over this hump soon!
Anyway, I am continuing to experiment with lots of new recipes. Today for lunch we had a yummy sausage tomato stew which I also made a couple of weeks ago. This is very simple and easy to make, and for us it just hits the spot. Today I made the whole recipe for the sauce, but I decided to halve the sausage and freeze half of the sauce for a later time. I served the stew with snap peas on the side and some various leftovers we had in the fridge. The first time I made it I added peas to the stew and served it with a salad.
Tomato Sausage Stew (GAPS-friendly)
Ingredients:
- 2 lbs sausage* (beef or other kind)
- 1 - 24 oz bottle strained tomatoes (I use this brand)
- 1/2 onion, quartered or coarsely chopped
- 2 medium zucchinis, cut up
- 3 cloves garlic, peeled
- 1/2 tsp salt (or to taste)
- additional spices (I just added a 1/2 tsp or so of basil)
Directions:
- Brown sausage in a medium skillet or stainless steel pan
- Meanwhile add the rest of the ingredients to a blender or vitamix
- Blend until you have a smooth puree
- Add the tomato sauce to the pan and bring to a boil. Then simmer on low for 5-10 minutes. I just for 5 because we were in a hurry to eat and it turned out just fine.
*One note on the sausage - almost all store bought sausage has sugar added, which is NOT Gaps legal. Whole Foods does sell some sugar free sausage, but you have to be careful about the ingredients. I have opted just to make our own sausage, which is also a cheaper option, by adding a spice blend to ground beef or pork or lamb. I modified a recipe I found online and will post it at some point soon :).
Monday, March 18, 2013
GAPS-friendly Carrot Ginger Soup

Carrots are a staple in our home. We used to eat a fair amount raw or sliced up in different dishes, but since starting the GAPS diet I have been using carrots in some more unique ways...veggie juice, carrot puree, carrot ginger soup. I had never had carrot soup before but as I am trying to get more and more soups into our meal plan I have been experimenting with a lot of different ideas and this one sounded good. No recipes I found worked 100% for the GAPS diet so I created my own, keeping to the basic routine I have been doing for soups: saute some onions and garlic in coconut oil or other GAPS allowed fat (tonight it was leftover beef fat from our sausage - and can I say YUM!), add in the main veggie, add some chicken stock, simmer until done and then add in some salt and pepper. This is very simple and so far has given some really tasty results.
I think I mentioned in one of my posts that our third child was boycotting the soups our first week on the diet. He is still hit or miss, but overall he is eating much more of the soups I make. Tonight he said he loved the carrot ginger soup we had and I think he finished it all with a very good attitude. We had this soup with some salmon and then cucumber slices on the side. Here is the recipe:
Carrot Ginger Soup
Ingredients:- 1/4 - 1/2 C coconut oil (we are using lots of fat right now to bulk up our calories)
- 2 medium onions, diced
- 4 Cloves garlic, crushed or finely chopped
- 1-2 inch chunk of ginger, finely chopped
- 2 lbs carrots
- 2 quarts chicken broth
- 2 tsp salt
- pepper
Heat up the oil in a large stock pot and then add the onions and saute for several minutes. Add the garlic and ginger and saute a couple of minutes more. Then add in the carrots and cook for another minute or two. Add the stock, bring to a boil and then simmer on low heat until carrots are soft. Add the salt and pepper and then puree with a hand held blender or in batches in a blender.
The first time I made this I took half of the soup and pureed it in the vitamix with about 1 lb of chicken. I served it to for lunch with avocado slices and a few more pieces of chicken on the side. Then we had the rest as a side dish the next day.
Friday, March 15, 2013
GAPS week one menu

Here we are - week one on the GAPS diet. I guess we are jumping in in some ways and also easing into it in some other ways. I completely altered most of our meals, but Nik and I attended a wedding our first official night so that was a lost cause for me. And then the kids had regular snacks at Sunday School today. I need to figure out something for them for that. But otherwise we are doing it and it is going okay. Erik is striking the soups I am making, but am praying he will come around because he used to LOVE soups - any kind of soup!
I am writing out all of our meal plans ahead of time and then logging what we end up actually eating on here so I can track it for future meal/snack ideas. This should give you a good idea of what we are eating/not eating.
Week One Meal Plan
Saturday:
- Breakfast: Fried apples with leftover beef muffins
- Lunch: Mushroom soup, shredded turnips and celery root fried in coconut oil (this was really good!)
- Dinner: Grass-fed beef hot dogs, carrot fries, cucumber slices (This was for the kids while I indulged at the wedding).
- Snacks - bananas, homemade lemon gummy candies
Sunday:
- Breakfast: Coconut milk/berry smoothie; handful of raw almonds (soaked and deyhdrated)
- Lunch: Mushroom soup, homemade lamb sausage (this was yummy!), leftover carrot fries
- Dinner: Salmon, large green salad, mashed butternut squash
- Snacks: apples, bananas; butternut squash with honey and coconut oil
Monday:
- Breakfast: Butternut squash with honey and coconut oil, bacon, sliced green peppers
- Lunch: Homemade chicken lunch meat, avocado mayo, lettuce for wrapping, tomatoes and carrots
- Roast chicken with onions, carrots & parsnips (I have since discovered parsnips are not gaps legal :( ), large salad with dressing made of olive oil and ACV, leftover Mushroom Soup
- Snacks: almonds, fruit leather, apples, blueberries fried in coconut oil
Tuesday:
- Breakfast: "Hashbrowns" made of celery root and turnips fried in leftover bacon fat, home made beef sausage, carrot sticks and hemp milk. Erik was extra hungry and had an egg afterward. NOTE: I am not doing eggs for any of our meals b/c this is something we have to limit for Joel right now.
- Lunch: Onion Broccoli Soup w/meatballs
- Dinner: Roast chicken leftovers
- Snacks: apples/bananas, almond flour "butter" cookies
Wednesday:
- Breakfast: Blueberry-banana coconut milk smoothie, macadamia nuts
- Lunch: Carrot Ginger soup with chicken, avocado slices on the side
- Dinner: Curry chicken w/green peppers and mashed cauliflower (So gooood!)
- Snacks: bananas, pureed butternut squash with coconut oil and raw honey
Thursday:
- Breakfast: Sausage, butternut squash puree with coconut oil and honey
- Lunch: Leftover carrot soup with hot dogs
- Dinner: Spaghetti w/zucchini noodles and a large, but plain salad
- Snacks: Green smoothie, Fried bananas, more bananas
Friday:
- Breakfast: Pumpkin pancakes
- Lunch: Broccoli soup w/white bean hummus and veggies
- Dinner: Round roast, salad, artichoke hearts
- Snack: Berry chia seed smoothie; fruit; nuts
Wednesday, March 13, 2013
GAPS - here we go

I have debated about this for about a year now - whether or not to put my family on the GAPS diet. If you have never heard of this, here is a link that explains the gist of it. I will dumb down the basics even more to say that it is a diet that restricts certain foods that irritate the gut with the goal to HEAL. It is a short term diet, meaning that it is not meant to be lifelong. However, you have to faithfully live on this diet for about 1 1/2 - 3 years in order for it to really work. No cheating allowed :).
Since we began our journey to healing several years ago, I feel that just about everything we have tried health-wise has been about improving our symptoms by removing foods form our diet and adding in healthier or more well tolerated alternatives. This has been so valuable and I have learned things that will forever affect how we eat. I don't envision us ever going back to the way we once ate. At the same time, I also feel that everything we have done has been about maintaining our current level of health without much hope that at some point Joel could go to a birthday party and have one cupcake and not throw up a couple of days later. Do I ever plan to regularly give him unhealthy refined cupcakes? NO! But do I want him to be able to tolerate wheat and dairy and be able to indulge on a rare occasssion? Yes!
The GAPS diet is really the first diet I have ever heard of that talks about healing the gut so that you can once again enjoy foods that your body cannot currently tolerate. Is it crazy? Yes! Is it incredibly restrictive? YES! Will people probably think we are more crazy that they even thought in the past. Probably. And will it cost us an arm and a leg? Yes - that too. But I cannot resist the hope of that simple word - healing. If it delivers and Joel's and my bodies are healed and we can visit friends for dinner without having to list a slew of no no foods, it will have been worth it. And if it doesn't deliver I don't see that much will be lost. And we will have gone on a family adventure together, weathered the good and tough times through it, learned greater levels of discipline, and probably gained at least some greater level of health.
I have debated over whether or not to do this diet for so many reasons: cost, what other people will think of us, and fears over whether I can do this right or not. But God has been challenging me to take more risks and to step out in faith. I believe He will heal my baby boy. He can do it supernaturally but that hasn't happened yet, so I am stepping out in faith that He might do it through the GAPS diet.
So, we are starting to ease into the GAPS and will do the full diet until the summer. Then my plan is to do the intro diet, which is the really tough part where you go through an shorter more intense elimination diet. I plan to at least attempt to keep logs of our meal plans, recipes, etc. I don't want to do anything crazy like this if it can't possibly benefit someone else. So if you are interested in the diet stay tuned and you can get a bird's eye view through us!
Saturday, November 17, 2012
The Best Cookbook Ever!!!

Almost exactly 3 years ago I went to see a nutritionist. She gave me the cookbook The Whole Life Nutrition Cookbook to aid me in my dietary goals. I have enjoyed this book thoroughly through the years as well as their blog. The authors, Alissa Segersten and Tom Malterre, are a couple with 5 kiddos. They both have nutrition degrees from Bastyr University. And they work together so beautifully to come up with amazing recipes that are both delicious and healthy! On their blog (and also found in their new cookbook) is my favorite recipe which I talked about on here before.
Through the years, my eating habits have continued to evolve. Though most of the information that has led to the changes I have made did not come directly through the Nourishing Meals website, I feel that their philosophy of eating now probably captures mine better than any other diet, cookbook or website. I have known for a while that they were coming out with a new cookbook, and when it came out it took everything in me not to jump and buy it right away. I didn't have the money to buy it at the time and thought I would wait patiently to get it for Christmas. But finally I couldn't wait any longer and I bought it!
In the short few weeks I have had the Nourishing Meals Cookbook I have made several recipes. And every single one is amazing!! Among them are:
- Mini Quiches with a Sweet Potato Crust (dairy free w/option to add cheese)
- Coconut Banana Breakfast Cake
- Breakfast Potatoes
- Sourdough Teff Bread (I will admit I am still working on this recipe - I think I am messing something up :) )
- Coconut Flour Biscuits
- Asian Chicken Salad
- Lean, Mean and Green Rice Salad
- Sloppy Joes
- Slow Cooked Beef Stew
- Chicken Pot Pies (w/Coconut Flour Biscuits for the grain-free option; pictured below - sorry the pics from my phone did not turn out well)
- Dairy-Free Macaroni and Cheese
- Avocado Mayonnaise
- Deep Dish Apple Pie filling (I didn't have time to make the crust, but the filling was yummy!)
- Chocolate Walnut Brownies (I used carob instead of chocolate and they were so great!)

Here are some of the things that I love about this book:
- It is whole food's based. No junk, and it includes plenty of veggies!
- They take a really healthy balance on grains. I have struggled between different views on grains and phytic acid. They address this issue in their book and recommend soaking to decrease phytic acid, as well as advise eating some meals grain-free, but they also recognize the benefits of phytic acid. They do offer several grain free recipes for those avoiding grains.
- Speaking of their grain free recipes - they have a few recipes using coconut flour (and some with almond flour, but I don't use almonds much because I don't digest them well). And seriously they are so superior to any other recipes I have used for coconut-flour products. Wow! I use coconut flour quite a bit and I am thrilled to have some higher quality recipes.
- I feel they have a great balance between meat-based recipes and vegan/vegetarian recipes. They also emphasize eating pastured meats, which is great! I often feel torn between grain-free Paleo, the Weston A. Price philosophy of eating, and also raw vegan as I enjoy aspects of all of these diets. I feel that this cookbook includes the things I love about each of them and has recipes that fit into each category.
- Important for our family - all of their recipes are GF and dairy free (though a few include optional dairy additions).
- They have a section on preserved foods which excites me because I am trying make more fermented vegetables.
- They have a very large section full of healthy desserts! I am especially anxious to try their mint chip ice cream.
Well I could go on and on, but hopefully you get the gist. If you are trying to live out healthy eating with your family, I really cannot recommend this cookbook enough. There are over 300 recipes, tons of helpful information on eating healthy and general nutrition and it includes some beautiful pictures of their recipes. Really my only complaint about this book is that I don't have enough time to make all the things I want to!
If you are interested, you can purchase it here on Amazon!
Thursday, September 6, 2012
My Favorite Summer Meal, Plus Black Bean and Mango Salad Recipe

As the summer weather will be quickly passing us by, I am trying to enjoy the food of summer as much as possible while I still can! What can beat (food-wise) all of the wonderful fresh fruit and vegetables, the fresh salmon, and more. Speaking of salmon, I really can't think of a better summer meal than one including fresh, wild Alaskan salmon. I feel so good after I eat it. During the summer we eat it once a week, though we try to eat it regularly throughout the year as well. Trader Joe's has really good prices on frozen salmon and that is where we usually get it in seasons other than summer, but it doesn't nearly taste as amazing as the good stuff we can get in summer.

Last night we had what is probably my all-time favorite summer meal. Fresh wild salmon, rice and a black bean and mango salad. Yummy! Please excuse my photos as I am still a newbie to photography, but hopefully from them you can get the gist. You might notice we are eating white rice instead of brown. I am still looking into this more, but one of the diets I am very interested in (The Perfect Health Diet) advocates for white rice over brown because it has a lower natural toxicity level. Because my kids love white rice that is what we have been eating lately. I personally prefer brown but I am going to be buying the book for this diet and reading more on what they have to say on the topic. What I really like about the Perfect Health Diet is that it is a Paleo-style diet but also maintains that we have a need for some "safe" starches. They allow for white rice, potatoes, sweet potatoes and tapioca. I am not adhering to this diet completely, and I know for sure I don't agree with every element of it, but it has been helpful as a guide as we have sought to decrease our grains/starches yet not eliminate them completely.
Alrighty, now that I have successfully taken a major side track off of my subject, back to our meal from last night. Here is my black bean salad recipe. I have made many different variations on it through the past couple of years. You can do it with corn, avocado or any variety of veggie and or fruit you like. This also makes a great side dish for a potluck!
Black Bean and Mango Salad
- ~2 C black beans (or 1 can)
- ~2 C cut up mango
- 1/2 C diced yellow pepper
- 1/8-1/4 C chopped green onion
- 1/4 C chopped cilantro
- 2 Tbsp olive oil
- 2 tsp apple cider vinegar (we have citrus issues, but you could use lemon or lime juice instead)
- salt to taste
- Optional: 1 avocado cubed (sometimes I do this instead of the yellow pepper)
Mix up all of the ingredients and serve!
Monday, August 13, 2012
A Tale of Two Pancakes

Like many families, ours has a tradition of making weekend pancakes. I think we have been doing this for about 9 years now. We started with your typical Bisquick recipe, then moved onto homemade soaked whole wheat pancakes and waffles. When we went gluten free I searched the internet for a recipe I could use and came across this fabulous, and easy, recipe. We use buckwheat for it and I will write the our modified recipe below. These pancakes were such a hit in our house, and so easy and inexpensive, that we ended up making them twice a week...or should I say my husband Nik made them :). Yay for hubbies that cook!
Now that we are trying to do a little less grains we are only making the buckwheat pancakes once a week and once a week I am making coconut flour pancakes. I searched the web for good recipes and have now tried two. The first ones ended up way too dry but the second recipe yielded really great pancakes. Check out the original recipe here. I will write my slightly modified recipe below.
While the buckwheat pancakes are the bigger hit with the kids, they do enjoy the coconut flour ones too. The coconut flour pancakes are quite a bit more expensive to make (how do you beat the price of cheap whole grains?!) but they are my personal favorites. They are super high in protein because of all the eggs, and I can give them to our baby who we have been keeping off of grains.
So if you are looking for a new pancake recipe, give one of these a try and let me know what you think! As usual, all of these are gluten, dairy and sugar free!
Blender Buckwheat Pancakes (Serves our family of 6) - from Sue Gregg's recipe, link above
Stage 1
- 3 C buttermilk or cultured dairy alternative (we use coconut or rice milk and include 2 Tbsp of pomegranate juice in the 3 C to sour)
- 4 Tbsp coconut or olive oil
- 2 C raw buckwheat groats
Blend the above 3 ingredients on high for 3-5 minutes. We have a vitamix so blending for about 1-2 minutes seems to be sufficient for us. Let sit overnight.
- 4 tsp baking powder
- 1 tsp baking soda
- 1 tsp salt
Stir the above 3 leavening ingredients in a small bowl.
Stage 2
- 2 eggs
- 4 Tbsp ground flax seeds
Add eggs and flax to the blender and blend on high for 1-3 minutes. Again, for us with the vitamix 1 minute is usually enough. Then add the leavenings you you mixed together the night before and blend just enough to incorporate thoroughly. Cook in waffle iron or griddle for pancakes.
Coconut Flour Pancakes (makes about 2 dozen) - slightly modified from cheeseslave recipe, link above
- 8 eggs
- 4 Tbsp ground flax seeds
- 3/4 C water
- 3/4 C coconut oil, melted
- 3/4 C coconut milk
- 6 tsp honey
- 4 tsp salt
- 3/4 C coconut flour
- 1/2 tsp baking powder
Mix eggs, flax seeds, water, coconut oil, coconut milk, honey and salt. Mix coconut flour and baking powder and coconut flour separately then add to the wet ingredients and mix thoroughly. Batter will be very thick. Spoon batter onto heated and oiled skillet to cook.
Thursday, August 2, 2012
Our Cloth Diaper Journey

Prior to having children I Never, and I mean NEVER thought I would use cloth diapers. I started my first baby on disposables without even a second thought about it. She was a month or two old when a friend shared with me that she would be using cloth diapers for her soon-to-be-due son. Honestly, I thought she was crazy! Who uses cloth diapers?! But the more she told me about these diapers she had found the more intrigued I became.
She was going to be using Fuzzi Bunz, a very popular brand of what are called pocket diapers. These diapers have a wonderful soft fleece lining on the inside that absorb quickly and dry to the touch, making them more comparable to a disposable. They have pockets in which you place a triple layered terry cloth insert. They can hold quite a bit. And in theory the cleaning is supposed to be quite simple. I am not sure why, but my friend hooked me and I started researching right away and by the time my daughter was 6 months old she was a Fuzzi Bunz wearer.
My love for these diapers was very short lived as I right away came across problems. Feel free to ask me if you are interested in hearing more, but the short of it is that these diapers don't absorb the way they are supposed to if you have a build up of detergent on them, so you don't want to use to much detergent. But if you don't use enough detergent they don't get clean. Absorbency issues and stink issues were a common problem for me. I am extremely stubborn and wanted to make them work so I stuck with them, troubleshooting the entire time, through 3 children. I had seasons with each of the kids where life was just a little too tough to be washing dirty diapers all the time and I resorted to disposables. But for the majority of each child's time in diapers we used the Fuzzi Bunz. We saved a ton of money and more than that I loved knowing they we weren't adding too much to the land fill and that my baby had something quality touching his tooshy, but I wouldn't say I was ever completely happy with this particular diaper.
Because we had such a rough first year with our fourth child James, I put him in disposables. I tried to find a natural diaper (not sure how great they really were though). We even tried to do cloth for a little bit but it was short lived. But since I finished pumping I started thinking of going back to cloth. I had some new Fuzzi Bunz I purchased on sale before James was born, as well as some used ones from a friend. I gave them a wash to get them ready but the same absorbency issues arose and I decided, no more Fuzzi Bunz! I can't believe I stuck them out so long. I had heard a ton about simple prefolds and different covers. I hated to make a change with just a year of diapering to go, but I decided to give them a try. And thankfully the expense is a whole lot less than Fuzzi Bunz so I was less worried about wasting money (though I will have to sell my Fuzzi Bunz to recoup some of what I spent on them). So here is what I am using now:
- Cloth-eez prefold diapers from Green Mountain Diapers
- Thirsties Duo Wrap which I purchased from Amazon
- Rockin' Green detergent for soft water
So far I love these diapers. They are inexpensive and easy to use and wash, and I don't have to worry about the absorbency problems I had with the Fuzzi Bunz. I can reuse the covers as they easily wipe clean. The main pro that the Fuzzi Bunz had over these is that they dry to the touch, which decreases chance of rashes. But as long as I change James frequently enough I am hoping this won't be an issue.
If I were to know what I know now from the very start, I would probably do the same prefolds with a wool cover. Wool is a great material plus it has self-cleaning benefits. But there seemed to be a bit of a learning curve to wool covers and I didn't feel like it was worth it being so close to being done with diapers. But if you are earlier on in the venture and are considering cloth diapers I highly recommend checking wool covers out!
I will keep you posted on how it goes with our new diapers. I am just a couple of weeks in so stink issues could still definitely arise, but hopefully they will work for us this year. My kids were all potty trained by age 2 so I do hope that James will only be in diapers one more year. Which brings me to one last plug - if you are truly interested in being environmentally conscious, you might want to consider potty training your kids at an early age (for those of you with kids :) ). No matter what diapering choice you make, the quicker you potty train the less impact your diapering will have on the environment (because even with cloth diapers you are still using up extra water and energy to wash them). I will write a post about our potty training experiences, but I am convinced the most children are fully capable of learning to use the toilet earlier and quicker than we give them credit for.
Tuesday, July 31, 2012
Our Natural Cleaning Products

Natural cleaners entered our home about 4 years ago, and I can't even remember how I got started on them. While I would love to say that I made the switch to "green" cleaning products to be more earth-conscious and healthy, I think I was more motivated by the desire to save a little money. It was the same thing with switching over to cloth diapers. But as a result I have become much more conscious of how all of our decisions in regard to the products we use can affect both the environment and our health. For me it feels really great to use products that work well (I personally find the products I use now to be way more effective than their commercial counterparts) and are also not dangerous for my children who want to help clean or my one year old who might go exploring under the sink.
When I first got started with natural cleaners I used a basic cleaner made up of half vinegar, half water. And then I added a little tea tree oil as a disinfectant. After a while I got lazy and started using Simple Green, which I have since learned is actually NOT a very green product. I have since dumped it. About 6 months ago though I got back on track with making my own products. I don't know what got into me but one day I just got up and revamped our whole cleaning system. I put together a basket for each bathroom and for the kitchen in order to have everything easily accessible for each place when I am cleaning. This also allows for more easy on the spot cleaning. I cleaned out all of our old spray bottles to reuse with my homemade vinegar cleaner. I put a bottle in each basket along with a bottle containing just plain water. I also put a tupperware container full of baking soda in each basket, along with a cleaning sponge and a cleaning rag. Lastly I added to each basket a little dark spry bottle that I filled with hydrogen peroxide. Here is a summary of what products I use for what chores:
Basic Cleaning: I use a mix of 1/2 vinegar, 1/2 water with a few drops of essential oils. I use this in a spray bottle to clean counter tops, floors, bathroom fixtures, the microwave, etc. Instead of using paper towels I use cleaning cloths made by Casabella and e-Cloth. I started out with the Casabella cloths and then my friend Catherine introduced me to e-cloths on her blog. I like them both quite a bit but am considering trying out another brand. I will keep you posted on that!
Stainless Steel Appliances: For these I either use the vinegar spray or just a spray of plain water with the e-cloths specialized for stainless steel, though I have found that the general e-cloths work fine too. The same would work for non-stainless steel appliances.
Sinks and Bath tubs: For these I use plain old baking soda and a scrub brush. It works great! This will work just fine on grout and tile as well, though our tub is in desperate need of a re-grout job so not even the greatest product can save us at this point! But to clean basic mold and mildew in bathrooms you can use the vinegar spray or hydrogen peroxide. If memory serves, I have heard that vinegar can wear down grout though, just FYI.
Mirrors and Windows: All I use here is water and the cloths from e-cloth intended for windows. It does take a little bit of elbow grease to get the windows and mirrors clean, but they are gleaming afterward!
Floors: We have porcelain tile floors in the kitchen and bathrooms. To clean them I will either use the vinegar cleaning spray with a rag or I will use my floor steam mop. I love my steam mop but the handle is broken so it is a little harder to use right now. Steam mops are a great way to clean and disinfect though!
Blinds and Basic Dusting: My least favorite chore is dusting. I use these dusting gloves. They make things soooo much easier!
Toilet Bowls: I either use baking soda with vinegar or the leftovers we still have of Clorox green toilet cleaner (which I am not even entirely sure is truly green - we won't buy more after we use it all up).
To disinfect or clean mold on windows I use hydrogen peroxide. I bought a couple of little hairspray bottles (the bottle needs to be dark for hydrogen peroxide) and dumped out the hairspray and cleaned them out. Then I filled with the hydrogen peroxide. I use this on door handles or other things I want to disinfect. For the mold on windows I first use the vinegar spray with a paper towel and then follow it up with the hydrogen peroxide.
So those are my cleaning basics. I have found that having the right products can make cleaning quite a bit more fun! And seriously, this route makes cleaning so much cheaper! The cleaning cloths might seem expensive at first, but keep in mind that they last for years and seriously reduce the need for paper towels. So they pay for themselves pretty quickly - not to mention they are better for the environment and do a FAR better job cleaning than paper towels do.
Monday, July 30, 2012
My Attempts At House Cleaning

I finally have stopped pumping milk for James and now I am catching up on many things that I wasn't able to do this past year. Cleaning is one of them! Before I had children I had a weekly cleaning time where I cleaned my entire house pretty thoroughly. After our first child Elise came that weekly time quickly vanished, only to be replaced with occasional cleaning times as there was need. I don't think our house has ever gotten super dirty, but as we have added more children and the time I have available to clean has simultaneously decreased, so too has the condition of our home. It is overwhelming!
Well, now a weekly couple hours of cleaning is not very realistic. However, my husband sent me an article a couple of years ago that talked about organizing the house into different areas and cleaning in one area for 15-20 minutes each day of the week. The idea is that you could get your whole house clean over the course of a week. Such a great idea! As I tried to figure out how to do this in my house I quickly realized there was no way I could clean my entire house in 5 or 6 15-minute slots. At least not at this point. So I improvised and divided my house into 4 zones, with the plan that I could focus on one zone each week. It would take one month to get the entire house thoroughly clean, but hey, that would result in more cleaning than I was doing at the time. I made this beautiful colored graph and everything and was so excited to get started. But, it never happened! I was probably pregnant or something and I just couldn't implement the new plan.
Fast forward to today. Now that I am not pumping for 2+ hours a day, I have a tiny bit more time (most of which is taken up with the kiddos) to actually get some cleaning in. So for the past three weeks I have been implementing my two-year old plan. And I really love it! Now it remains to be seen if I can stick with it, but at least this is a great start. The first week I thoroughly cleaned the kitchen, pantry and laundry room. Last week I did the dining room, living room, and my daughter Elise's room. This week is the office, entry way, boys' room and downstairs bathtub (the rest of that bathroom gets cleaned weekly because we host a community group for our church). The fourth week of the month I will clean the master bedroom and bath and the baby's room. Some things still need to be cleaned more regularly (like the sinks, counters and kitchen floors), but usually those just take a few minutes here and there.
Keeping a clean house can make an impact on overall health. Lots of dust in the air, as well as mold and mildew have the real potential to harm our bodies. However, if we are using toxic chemicals to get rid of dust, mildew and mold, we are setting ourselves up for even more harm. Over the past few years I have slowly transitioned to using natural cleaning products. There are so many reasons I am excited about this! Next time I will share with you some of the things I am currently using to make cleaning safer and easier in my home!
Thursday, July 5, 2012
Chicken and Biscuits Recipe

I LOVE chicken pot pie! Seriously love! I remember the first time I went to a Marie Calendar's restaurant and got one of their amazing pies with the perfectly flaky crust and rich chicken and veggie filling. Oh yum! When Nik and I got married his mom gave me a pot pie recipe that I made regularly. It was one of our favorite dishes, always served with tons of cold cottage cheese. Now that we are gluten and dairy free that meal is a distant memory for sure. However I have made lots of variations through the years to try to keep it alive in some form. I have tried several gluten free crusts but none were real winners, and I wasn't crazy about the ingredients anyway. In the last few years I have opted to just make a pot pie filling and serve with biscuits. Now that we are trying to do less grains, I have been making the biscuits out of coconut flour. They are pretty sweet so the flavor is a bit different than traditional biscuits, but they are still really tasty.
Now in the past this dish has not been the biggest hit with my kids. I was always so surprised that they didn't love it! I remember always being such a fan as a kid. I think the big issue was that they prefer not to have their food all mixed together. When I made this a couple of days ago it was the first time they seemed to enjoy it. Finally!
I am going to be really honest - this is not the quickest of meals to make. Nothing about it is too tricky or complicated, but it involves a lot of cutting and chopping and a few different pots. As I look over the recipe I keep feeling like it shouldn't take so long, but every time I make it it ends up being a little more involved than I thought it would be. Part of it is that pulling all of the chicken off of the bone and cutting it up is really time consuming. So this is not something I make too often. This week I made a bigger amount and we had this two nights in a row to make all of the work worth it.
Last thing to mention before getting to this recipe - from the picture it looks really potato-heavy and lacking in chicken. We were half way through dinner when I remembered to take a picture. My son had the fullest and neatest plate so I took a picture of his meal, but he had already eaten most of his chicken. So the picture isn't super accurate :).
Chicken Pot Pie Filling with Biscuits
Ingredients:
- 1 Whole Chicken, cooked, meat removed and cut up (I have the butcher cut up the chicken into 8 pieces for me) - I cook mine at 350 degrees for 1 1/2 hours.
- 8 medium-sized carrots, sliced
- 4 large red potatoes
- 3 stalks celery, sliced
- 1 onion, diced
- 3 cloves garlic, mashed
- 4 Tbsp butter or palm oil
- 2-3 C frozen peas
- 2 C chicken stock
- 2 Tbsp thickener (I used arrowroot starch, but you could use any flour or starch)
- 1/2 tsp thyme
- 2 tsp salt (or to taste)
- 1/2 tsp pepper (or to taste)
Directions:
- Steam the carrots and potatoes in a large pot until fork tender. For me this takes about 20-30 mins, depending on how small I cut the veggies.
- While the carrots/potatoes are steaming, melt butter or palm oil in a large stock pot. Add onion, celery and garlic and saute until tender. Add the thyme.
- Once the potatoes and carrots are done add to the onion mixture. Add the frozen peas as well.
- Mix the thickener in with the chicken stock and stir to incorporate it completely. Then add the stock to the stock pot. Bring to a soft boil and then reduce heat slightly, stirring until thickened.
- Now add the salt and pepper to taste.
- Serve over biscuits of your choice. Here is the recipe I used. I made the recipe times 1 1/2 to make enough biscuits for two nights. (You will have to scroll down the page to find the biscuit recipe. I feel like these are way to sweet so I cut the honey in half.)
Monday, July 2, 2012
Surviving a Road Trip With Kids

Whew! It has been a long few weeks, but I am finally getting back to writing! Our family went on vacation to Idaho a couple of weeks ago. When you have a family with food sensitivities, in addition to one on a whole foods diet, vacations end up looking quite a bit different than the typical eat out as you go vacations. After all of the menu planning, grocery shopping, food preparation, packing and other things that went into our vacation I sincerely needed another break to recover from all of the work :). But it was soooo worth it. We had a great time and made many beautiful memories!
Our Idaho vacation involved a 6-7 hour car trip each way. We have done a few car trips with the kids over the years, and thankfully they have all gone really well. Of course we have had the occasional kerfuffle, like Joel getting overheated and throwing up in the car (note to self: keep air conditioning on in the back of the car during road trips!), but our kids for the most part are awesome travelers. I am sure most of it is just good fortune (and a lot of prayer!). However there are a few things we have done to try to make the road traveled a bit smoother. So in memory of our wonderful trip I thought I would share our travelling tips!
Have Plenty For Them To Do
I am sure most parents already do this, but every time we travel we make sure the kids bring a backpack on the trip loaded with activities they will enjoy doing. A day or two before we leave I have the kids bring me their packs and choose their favorite coloring books, reading books and toys. We just stuff their packs as full as possible. I give them each a ziplock bag with their own crayons or colored pencils for easy access. I don't allow markers in the car. For our 3 year old Erik I keep his bag in a place where I can access it so I can pass toys back to him. I need a pretty good pile of things since he tends to drop things along the way. Oh, and I must not forget that they also have their favorite blankets and stuffed animals with them to keep them occupied! One must never travel without those :)!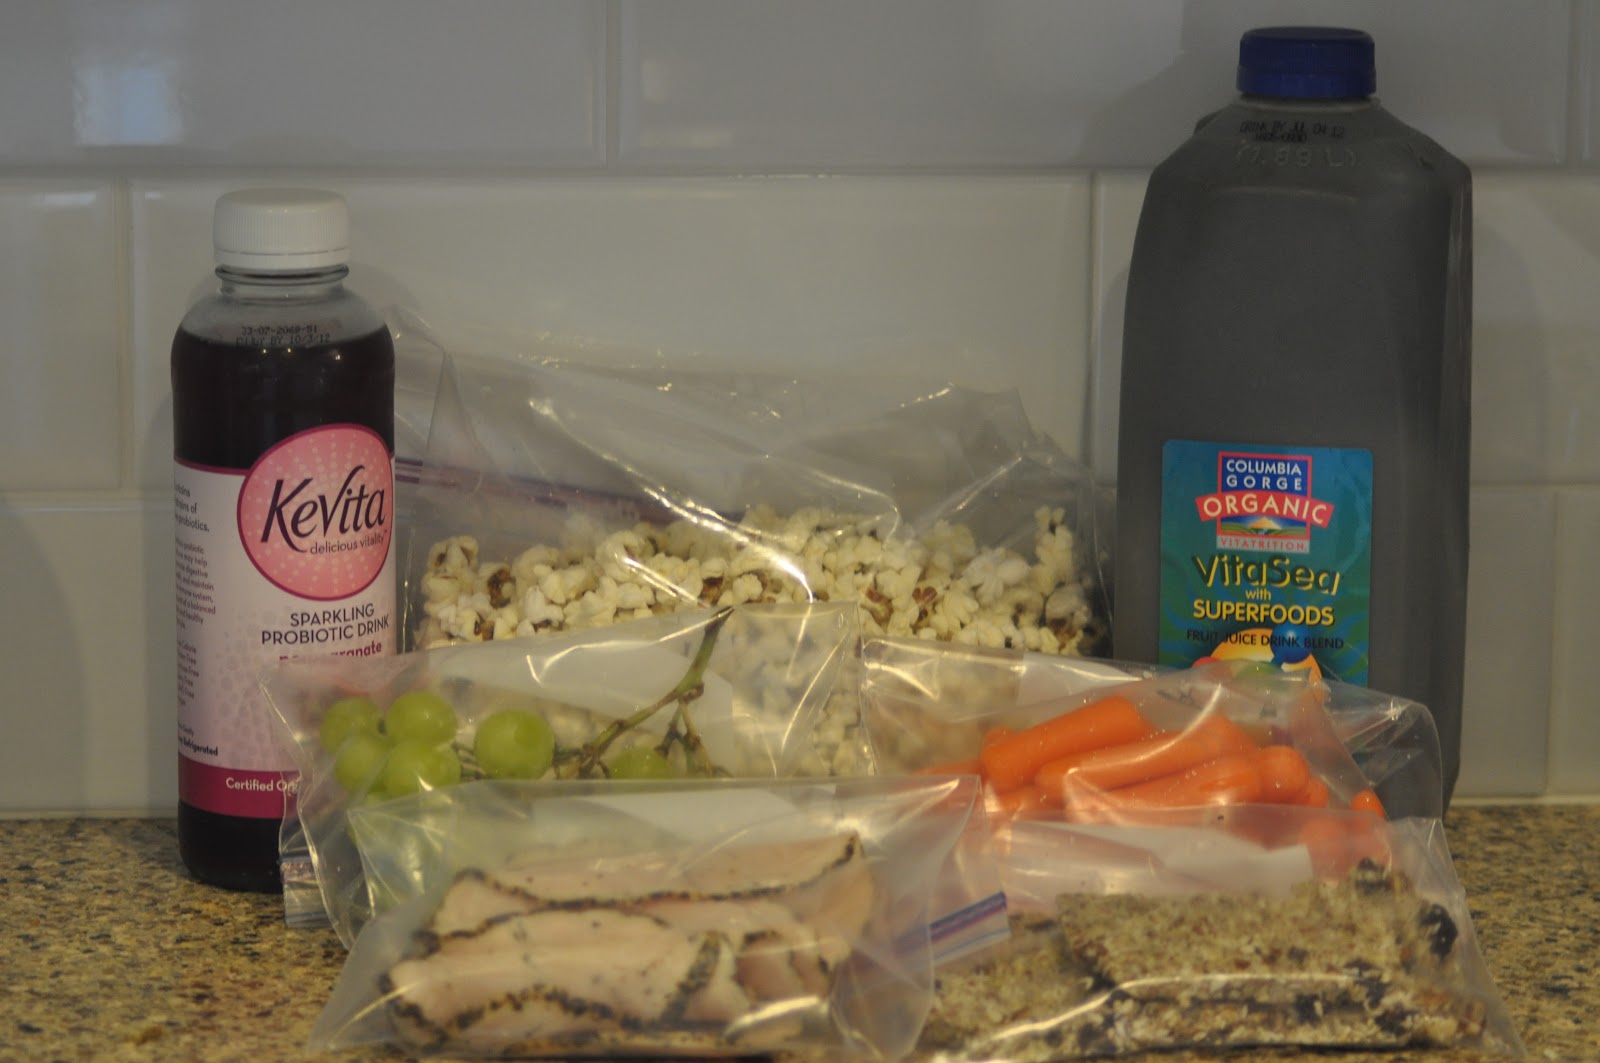
Snacks, Snacks and More Snacks
I think this is the key to our travelling success. I give the kids several bags of snacks and keep them eating throughout the whole trip. This helps in two ways. Number one it negates the need to stop for lunch or dinner because instead of stopping to eat we just snack through our meals in the car. But this also keeps the kids sooo happy. Whenever they start getting really bored or stir crazy we let them dig into another snack bag. For this trip I did the same basic things on both the way there and the way back. We had organic green smoothies (loaded with calories to fill the kiddos up) in their stainless steel straw cups, carrot sticks, lunch meat slices, grapes, popcorn, and these homemade granola bars as well as a banana each. (For the granola bars I did slightly less honey, which made them a bit crumbly, and I also used soaked and dehydrated nuts & seeds). I also had large bottles of water for them to keep them hydrated. I found that I had just enough food to last for our 6 hour trip. If we had a longer drive I definitely would have needed more food bags!Family Quiet Time With Video Reward
Because we still have young nappers in our family we need to have a time of quiet in the car so they can sleep. We usually keep it to about an hour and as a helpful incentive they can watch a short video in the car afterward. We are NOT normally bribe advocates, but I think that car trips can qualify as an exception to the rule. We usually do this toward the end of the trip, as we try to keep the video watching to a minimum. I also save their favorite snack for the video time. So if you wanted to try this out but don't have a DVD player in the car you could just use a special snack as a reward.We didn't do this on our last trip, but in the past we have played games like rock, paper scissors and I-Spy or we have sung songs (singing Christmas carols together is so fun if you are travelling around the holidays). As far as keeping baby happy goes, I don't have much of a strategy. We just pray a lot and hope for the best. Thankfully our baby James is located in the very center of the car and I think he was just so happy to be with the whole family that he was content for the majority of the trip. I had plenty of pacifiers handy and a bag full of toys and small board books to pass back to him though.
So for those of you with young kiddos, what are your strategies for keeping the kids occupied in the car? For those of you without kids, what do you do to keep yourself content during a long car ride? I would love to hear your thoughts! Oh, and if you want a grain free granola bar, you really should try out that recipe I put up the link for. It really is yummalicious!
Monday, June 4, 2012
How A Movie Changed My View of Meat

Growing up I ate your average commercial meat. I gave up red meat and pork for a season while I was in college, but otherwise I have been a true American carnivore. However, for most of my life, I never considered the issue of meat quality. I figured people either ate meat or they didn't, and maybe there were some healthier cuts of meat for meat eaters to choose. But the thought that there were vast differences between the quality of meat from one animal to another based on their conditions...it just never entered my mind. Here is how our thinking about and consumption of meat has changed through the last several years...
How we started eating better meat quality
Years ago, when I first started making major changes to our diet, I began introducing free range chicken into our meals. I had read about the value of eating free range, organic meats, and also eating grass fed beef. It felt overwhelming to think of making all of those changes, and at the time it felt like a huge leap financially. We had been eating conventional chicken breasts from Costco and the price just couldn't be beat. Changing to free range chicken not only was a price change, but to make it more economical I was making entire chickens instead of just breasts. I had never before handled a whole chicken so it was a completely new experience for this newbie chef! I continued purchasing conventional beef for the time being as to not completely overwhelm myself or my sweet hubby who was a little perplexed by all of the changes I was suddenly making to our diet.Anyway, after a couple of years we started dabbling in a little bit of organic chicken and organic beef, as well as grass-fed beef on rare occasions. Then I found a great supplier for grass-fed ground beef that had great quality but also beat out the other prices I could find. So that finally became a staple in our home. And then I landed on buying free range chickens from Whole Foods. Though I didn't always buy the organic chicken, the quality of the chickens' lives were pretty good there and it meant more to me to have high quality of life than to have an organic chicken being raised in poor conditions.
How Food Inc. solidified things for us
It was around this same time that my husband Nik and I sat down to watch the movie Food Inc. At this point in our journey the information we learned was not completely new to us, yet it was still shocking! This movie introduces you to the reality of what we are eating as a nation, the life conditions of most of the animals our country consumes, and some of the sad politics behind it all. While it covered much more than just the topic of meat, that was one of two topics that left the greatest impact on me. If I wasn't completely floored to feed my family well before (and I was), I sure was now!For me the movie Food Inc. completely solidified my convictions to eat quality meat. While I "knew" that free range was better, it was not really until I saw the conditions of most animals that people in our country consume that I understood how vastly different the quality of life can be from one animal to another. And I came to realize that the title "natural" says absolutely nothing about the quality of life of the animals. Before this movie I just did not think enough about the realities of where my food came from. My new understanding was painful for me on two points. One, it was hard to see that these poor animals are living such horrible lives. It was just wrong! Second, even though we didn't eat that kind of meat anymore, I had to swallow the truth that for most of my life I did eat that kind of meat.
A righteous man cares for the needs of his animal...Proverbs 12:10a
Now that I have resolved to only eat quality meat, what does that mean? For me that means we only eat meat that comes from animals raised on healthy farms with space to roam and where they are treated with care and respect. The animals are also not given hormones or antibiotics. And how do I know what the living conditions of the meat we eat are? Well, I find out. I either look up the farms online to get information and talk to the farmer's directly, or I buy from Whole Foods which gives an animal wellness rating to all meat they sell. For the most part we eat organic now, but as I mentioned above, especially after seeing the movie, I would personally place the animal's quality of life above organic if I had to choose. My convictions have become so deep that if for some reason we weren't able to afford the kind of meat I am talking about, I would rather do without. And to make eating the kind of meat we do eat more affordable, we do a few vegan dinners a week because it cuts down on how much meat we need to buy. We are still not able eat my absolute ideal chicken (pastured chicken from our local Farmer's Market is $6-7/lb for a whole chicken), but the chicken at Whole Foods is really an amazing second best option.
I highly recommend that you watch this video if you have not already seen it. It is available on Netflix along with Food Matters - another movie that has the potential to forever change the way you see food. If you are eating conventional meats right now (which is pretty much all that is sold at your typical grocery store like Safeway or Albertsons), I warn you that it would be hard to watch this video and then continue eating the same way. So be prepared for change, or at least some change in the way you think about food!
What to do if you feel compelled to change but can't foot the bill
If you haven't noticed, I am a very budget conscious person. I think this is because I am constantly living in the tension between the convictions I carry regarding what we eat and the realities of what I can actually spend. I think that with some sacrifice most folks could afford to make some productive changes regarding their food quality. And in general I don't think most people put nearly a high enough value on eating quality foods. I do believe that we are what we eat. However, most of my friends have budget limits. So if you do find yourself wanting to increase your meat quality but just don't know how to make it work with your wallet here is what I would suggest...- Start slowly. If you have a Trader Joe's nearby they have great Free Range chickens for a slightly more affordable price. I have researched their Ranger Chickens and the main review I read on the farm that raises them had a lot of positive things to say about the conditions there.
- If you don't have a Trader Joe's you can search local butchers and local food co-ops. Price things out and see if there is a step up you can make that won't overwhelm your budget too much. Remember, you might be able to find quality chicken that is not organic. This is at least a step in the right direction.
- Consider eating less meat so you can afford better quality. Just be conscious that your family gets in enough protein if you do this.
- If you decide you just cannot increase your meat quality, I would suggest the same thing as #3 - at least reduce the amount of meat you eat. Conventional meat, aside from being from animals raised in horrible conditions who are therefore not very healthy, can also be loaded with antibiotics. The less of this in your system the better.
Thursday, May 31, 2012
My Current Favorite Meal

This meal , called Curried Lentil and Rice Casserole, was an absolute hit! Everyone loved it! I think I have mentioned somewhere in a post or two that I get bored very easily and don't enjoy eating the same thing for dinner very often. However, I am making this meal today for the third time in a little over a month. I am not sure exactly what it is, but it just works. The flavors are delicious, the texture is perfect. I highly recommend that you give it a try!


Because the recipe does include rice and lentils, which I normally soak, I modified the instructions a little to include soaking. This sounds a bit complicated, but it was the easiest way I could figure to do it.
- The recipe calls for 5 C of water. For one of those cups I had a Tbsp of apple cider vinegar plus enough water to make 1 C and added it to the rice to soak. I soaked the rice starting early in the morning.
- For the lentils I added about 3 or 4 C of water (including a Tbsp or 2 of the apple cider vinegar) and soaked overnight.
- When it was time to make the meal I calculated how much water the lentils had soaked up by subtracting the residual soaking water from the amount I started with the night before.
- Then I rinsed the lentils and added them and the rice (with the rice soaking water) to the casserole dish with the other ingredients. And then I added enough water to bring the total liquid amount (including the 1 C I had soaked the rice in and the amount the lentils had soaked up) to 5 C.
- I added about 1/2-1 Tbsp honey because I love for my curry to have a bit of sweetness to it.
- I added a cup of peas.
Subscribe to:
Posts (Atom)